

Understanding The ins and outs of Docker Containers 🐳
Mastering the Power of Containerization with Docker


Table of contents
- Introduction to Docker Containers 🫙
- Benefits of Using Docker Containers 🤩
- Creating Docker Images ☸️
- Running Docker Containers 🧑🏻💻
- Managing Docker Containers 💼
- Networking in Docker Containers 🌐
- Using Docker Volumes 📀
- Docker Compose 🗄️
- Monitoring and Debugging Docker Containers 🔎
- Security Best Practices for Docker Containers 💂🏻
- Conclusion 💡
Introduction to Docker Containers 🫙

Are you tired of dealing with the headache of application deployment? Say hello to Docker containers!
Containerization is the process of packaging applications and their dependencies into self-contained units called containers. And Docker containers are the most popular way to achieve this. They're lightweight, efficient, and portable, making it easy to move them from development to production.
Docker containers are built from Docker images, which are blueprints for creating containers. These images can be easily shared and deployed on any infrastructure, giving you the flexibility to run your applications wherever you want.
With Docker containers, you can say goodbye to the old-school headaches of application deployment and embrace a world of portability, efficiency, and scalability. Get on board the Docker train and make your life easier today!
Benefits of Using Docker Containers 🤩

Here are just a few reasons why using Docker containers can make your life easier:
| Reason | How? |
| Scalability | Docker containers make it easy to scale your applications up or down depending on demand. Need more resources? Just spin up more containers. Need less? Scale down with ease. |
| Portability | Docker containers are portable and can be easily moved from one environment to another. Whether you're deploying your application on-premises or in the cloud, Docker containers make it easy to move your application without having to worry about compatibility issues. |
| Efficiency | Docker containers are lightweight and efficient, which means they use fewer resources than traditional virtual machines. This can translate to cost savings and better performance for your applications. |
By using Docker containers, you can enjoy these benefits and more. Say goodbye to headaches and hello to the world of Docker!
Creating Docker Images ☸️

Ready to create some Docker images? It's easier than you think!
First, you'll need to create a Dockerfile, which is a text file that contains instructions for building an image. These instructions specify the application code, dependencies, and configuration settings.
Here's a step-by-step guide to creating a simple Dockerfile:
Choose a base image: The first step in creating a Dockerfile is to choose a base image to use as the foundation for your image. You can search for available base images on Docker Hub, which is a registry of Docker images maintained by Docker.
For this example, let's choose the official Python 3.9 image as our base image:
FROM python:3.9Set the working directory: The next step is to set the working directory for your application inside the container:
WORKDIR /appCopy application files: Copy the application files from your local machine to the container:
COPY . /appInstall dependencies: Install any dependencies your application needs using the package manager of your choice. For example, if your application uses pip to manage Python packages, you can run:
RUN pip install -r requirements.txtSet the command to run: Finally, set the command that should be run when the container starts:
CMD ["python", "app.py"]
Putting it all together, here's what our complete Dockerfile looks like:
FROM python:3.9

WORKDIR /app

COPY . /app

RUN pip install -r requirements.txt

CMD ["python", "app.py"]
Once you've created your Dockerfile, you can use the docker build command to build the image. Docker will use the instructions in the Dockerfile to build the image, which can then be used to create one or more containers.
But wait, there's more! You can also use other tools like Docker Compose and Docker Swarm to manage multiple containers and deploy them across different environments.
Creating Docker images may sound intimidating, but with Docker, it's a breeze. Just follow the instructions in your Dockerfile, use the docker build command, and you're on your way to containerization bliss!
Running Docker Containers 🧑🏻💻
Ready to run some Docker containers? Let's do this!
First, you'll need to use the docker run command to start a container. This command takes several options and configurations, including the image name, container name, port mappings, and more.
For example, to start a container from the nginx image and map port 80 on the container to port 8080 on the host machine, you can run:
docker run -d -p 8080:80 --name my-nginx nginx
This will start a new container from the nginx image, name it my-nginx, and map port 80 on the container to port 8080 on the host machine.
But wait, there's more! You can also use other options and configurations like volumes, environment variables, and network settings to customize your containers even further.
Here's a bit more information on some of the other options and configurations you can use when running Docker containers: 🪶
Volumes: Volumes allow you to persist data outside of the container's file system, so you can easily share data between containers or between a container and the host machine. To use a volume, you can specify the
-voption when running thedocker runcommand.Environment Variables: Environment variables allow you to pass configuration settings to your application at runtime. To set an environment variable in a container, you can use the
-eoption when running thedocker runcommand.Network Settings: Network settings allow you to control how your containers communicate with each other and with the outside world. You can use the
--networkoption to specify a custom network for your container, or use the--linkoption to link your container to another container.
And don't forget about Docker Compose, which makes it easy to run and manage multiple containers at once.
Running Docker containers may sound complicated, but with Docker, it's a breeze. Just use the docker run command and your options and configurations, and you're on your way to containerization bliss!
Managing Docker Containers 💼

Managing Docker containers is like being a conductor of a symphony - you're in charge of everything!
To start a container, you can use the docker start command followed by the container name or ID:
docker start my-container
To stop a container, use the docker stop command:
docker stop my-container
Need to pause a container for a bit? Use the docker pause command:
docker pause my-container
And when you're ready to get things moving again, use docker unpause to resume the container:
docker unpause my-container
Finally, when you're ready to say goodbye to a container, use the docker rm command to delete it:
docker rm my-container
But wait, there's more! You can also use the docker ps command to list running containers, the docker logs command to view container logs, and the docker exec command to run commands inside a container.
Here's a bit more information on some of the other commands you can use to manage your Docker containers:
docker ps: The
docker pscommand is used to list all running containers. By default, it will only show the container ID, name, image, and status, but you can use options like-ato show all containers, including stopped ones, and-qto show only the container IDs.docker logs: The
docker logscommand is used to view the logs for a container. You can use the container name or ID as an argument, and use options like--followto follow the logs in real-time and--tailto show only the last few lines.docker exec: The
docker execcommand is used to run commands inside a running container. You can use the container name or ID as an argument, and specify the command you want to run. For example, to start a shell inside a container, you can rundocker exec -it my-container /bin/bash.NOTE: The option
-itspecifies that we want to run the command interactively, and allocate a pseudo-TTY to the container session.
Managing Docker containers may sound like a lot of work, but with Docker's powerful command-line interface, you'll be conducting your container orchestra like a pro in no time!
Networking in Docker Containers 🌐
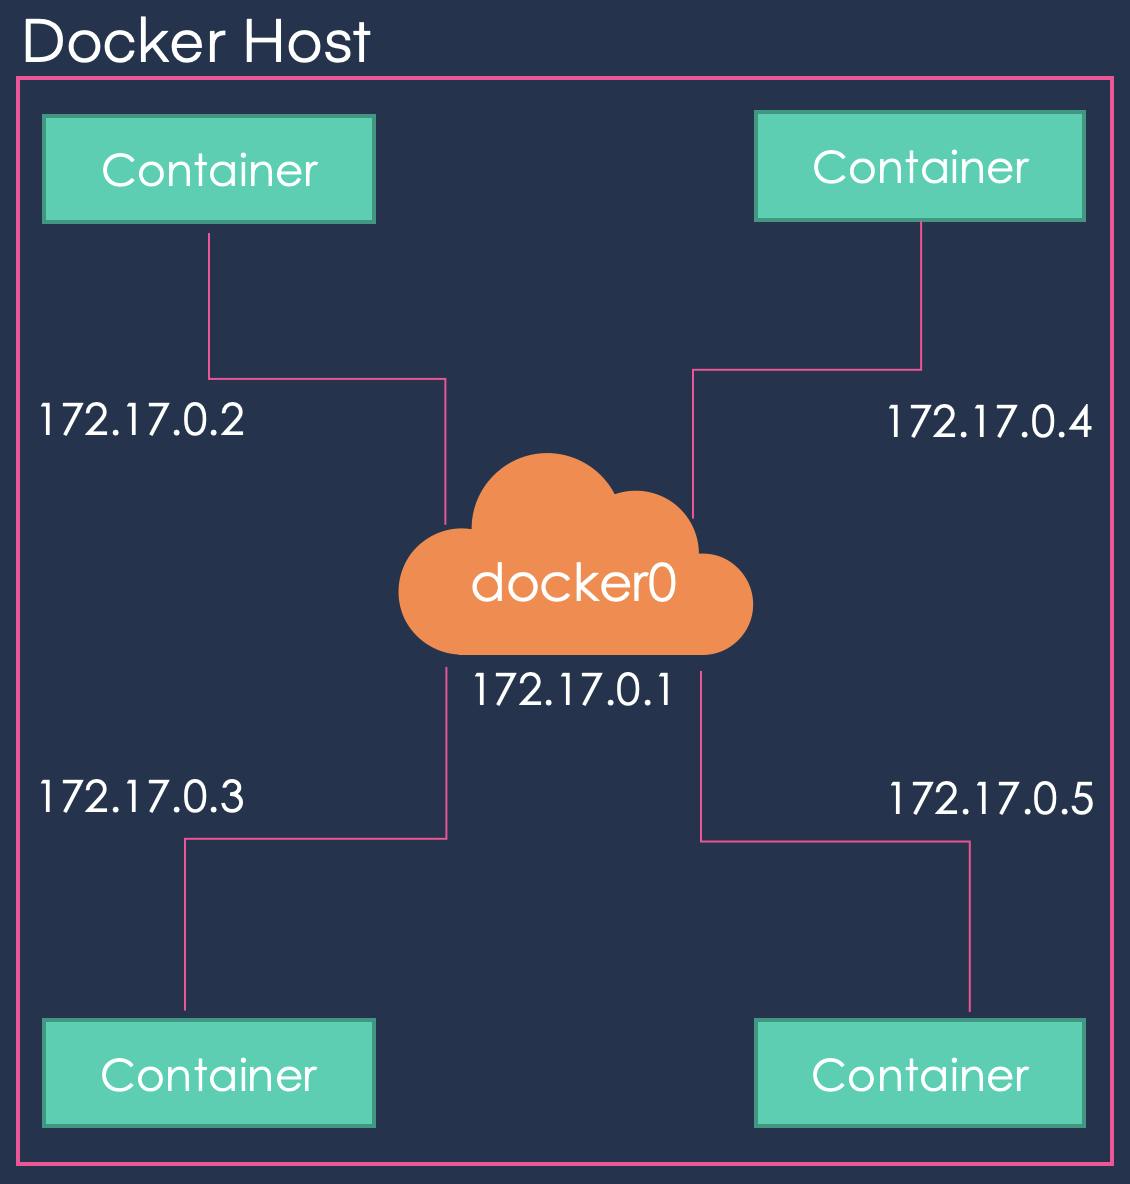
Networking in Docker containers is like making friends - it's all about connection. In Docker, containers can be connected to the outside world using different networking options.
By default, Docker creates a bridge network for each host, allowing containers to communicate with each other and with the host system. You can also create custom networks and attach containers to them for greater control over your network topology.
To configure networking in Docker containers, you can use a variety of commands and options. Here are some of the most commonly used ones:
| Commands / Options | Description |
| docker network create | This command is used to create a custom network in Docker. For example, you can create a network named "my-network" by running docker network create my-network. |
| docker run --network | This option is used to attach a container to a specific network. For example, to start a container named "my-container" and attach it to the "my-network" network, you can run docker run --network my-network my-image. |
| docker run -p | This option is used to map container ports to the host system. For example, to map port 80 inside a container to port 8080 on the host system, you can run docker run -p 8080:80 my-image. |
| Environment variables | You can use environment variables to configure network settings in Docker. For example, you can set the MYSQL_HOST environment variable to the IP address of a MySQL server that your container needs to connect to. |
| docker-compose | Docker Compose is a tool for defining and running multi-container Docker applications. With Compose, you can define custom networks and connect containers to them, specify port mappings, and configure environment variables and other settings. |
Overall, Docker's networking capabilities make it easy to build complex, multi-container applications that communicate with each other seamlessly. So don't be shy - connect your containers and make some new networking friends!
Using Docker Volumes 📀
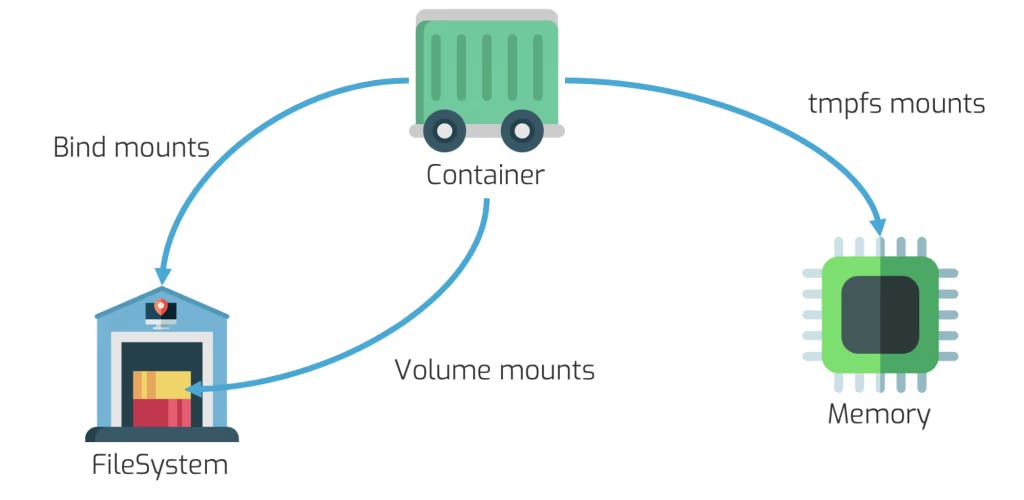
Let's talk about Docker volumes - the Swiss Army knife of data management in containers! Docker volumes allow you to persist data between container runs and share it between multiple containers.
By using volumes, you can separate your application data from your container image, making it easier to update and manage your containers without losing important data. You can also share data between containers running on the same host or different hosts, making it easier to build scalable, distributed applications.
Here's an example to illustrate how to use Docker volumes:
To create a Docker volume, you can run the following command:
docker volume create my-dataTo attach the volume to a container, you can use the
--mountoption when running the container. For example:docker run -d --name my-container --mount source=my-data,target=/data my-imageThis command starts a container named "my-container" using the "my-image" image and attaches the "my-data" volume to the "/data" directory inside the container.
Alternatively, you can create and attach a volume to a container at the same time using the
-voption. For example:docker run -d --name my-container -v my-data:/data my-imageThis command creates a volume named "my-data" and attaches it to the "/data" directory inside the "my-container" container.
Overall, Docker volumes are a powerful tool for managing data in containers, allowing you to build more robust and flexible applications. So go ahead, create some volumes and start persisting and sharing your data like a pro!
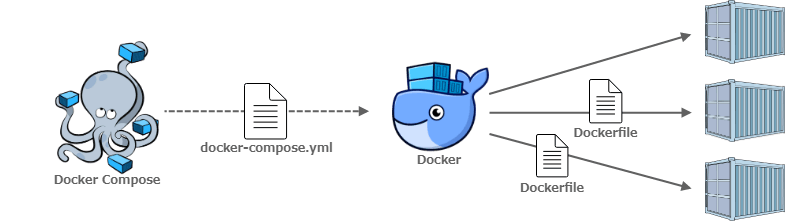
Docker Compose 🗄️

Are you tired of running multiple Docker containers manually? Do you want an easier way to define and run multi-container Docker applications? Look no further than Docker Compose!
Docker Compose is a tool that allows you to define and run multi-container Docker applications with a single command. With Docker Compose, you can define your application's services, networks, and volumes in a YAML file, making it easier to manage and deploy your application.
To use Docker Compose, you can create a
docker-compose.ymlfile in your project directory, define your services and their configurations, and then run thedocker-compose upcommand to start your application. Docker Compose will automatically create and manage the necessary containers, networks, and volumes for you.Docker Compose also allows you to scale your application by running multiple instances of your services, making it easier to handle increased traffic or demand. And with support for environment variables and secrets, you can easily manage sensitive information like API keys or passwords.
Monitoring and Debugging Docker Containers 🔎

Is your Docker container misbehaving? Don't worry, we've got you covered!
There are several tools and techniques available to monitor and debug Docker containers.
One of the most popular tools is Docker Stats, which provides real-time performance metrics for your containers. You can use it to monitor CPU, memory, and network usage, among other things.
Another useful tool is Docker Logs, which allows you to view the logs generated by your containers. This can be helpful for debugging issues and troubleshooting errors.
If you need to get inside your container to debug further, you can use the Docker exec command we mentioned earlier. This allows you to run commands inside your container, just like you would on a regular Linux machine.
And finally, there are third-party tools like Prometheus and Grafana that you can use to monitor and visualize the performance of your Docker containers.
With these tools at your disposal, you'll be able to keep your Docker containers in tip-top shape and running smoothly. So go ahead, experiment with different monitoring and debugging techniques and impress your colleagues with your Docker skills!
Security Best Practices for Docker Containers 💂🏻

Docker containers can be super secure if you follow some best practices!
Here's an example of how to implement some of these security best practices in your Docker environment:
Use containerization and user namespaces to isolate your containers from each other and the host system:
docker run --userns=host --security-opt=no-new-privileges mycontainerScan your Docker images for vulnerabilities before running them in production using a tool like Anchore:
anchore-cli image scan myimage:latestAccess controls are also crucial. Make sure to limit access to your Docker API and use role-based access controls (RBAC) to manage permissions for users and services.
docker run -v /var/run/docker.sock:/var/run/docker.sock -v /etc/docker:/etc/docker -e PUID=1000 -e PGID=1000 --name portainer --restart=always --network=host portainer/portainer-ce --admin-password='$2y$05$asgrnJnFLNG6MBEqYrLeROd6x3q6X/9H8yUOrR27.yQg70bg6cZv6'Keep your Docker environment up to date with the latest security patches and updates:
docker pull myimage:latest
By implementing these security best practices, you can help ensure that your Docker containers are secure and protected from potential security threats. So go ahead, use Docker with confidence, and impress your security team with your container security prowess!
Want to keep your Docker safe and sound? Check out these "21 Docker Security Tips" covering Daemon, Image, and Container security!
Just click here: 21 Docker Security Best Practices – Daemon, Image & Container
Conclusion 💡

Congratulations, you made it to the end of this article! By now, you should have a solid understanding of Docker containers and how to use them for your applications. Now that you have a good grasp of Docker containers, it's time to get your hands dirty and start experimenting. Happy containerizing! ✨