


JavaScript has become a popular language for web development due to its versatility, ease of use, and flexibility. But with the increase in complexity of JavaScript applications, code maintenance and performance optimization have become challenging. This is where Babel and Webpack come in. In this article, we'll take a closer look at Babel and Webpack, their features, and how they can help developers streamline their JavaScript workflows. So let's dive in! 🫱🏻🫲🏽
Why use Babel? ⚙️
The answer is - simply to convert the latest ES6 and ES5 (ECMAScript) code into browser-readable ES5, i.e, backward compatibility. ECMAScript is supported by the latest JavaScript updates which offer cleaner, less and more readable code for developers. In other words, Babel is a JS compiler that compiles newer JS into older JS - called Transpiler. It is used commonly for both front-end and back-end.
Let's check a code snippet in ES6 -
const sum = (a, b) => a + b;
Transpiled code -
"use strict";

var sum = function sum(a, b) {
  return a + b;
};
A one-line code for adding two numbers is transpiled into multiple lines of code for the browser to understand, which is effortlessly handled by Babel for us.
Okay, but Why use Webpack? 📦
Babel can compile only JS files but Webpack can compile all kinds of languages or assets such as CSS, SASS, images, JSON files, fonts and more. Webpack often runs Babel as one of its jobs to compile JS files. In other words, Webpack is a bundler that uses a dependency graph(All our interconnected files and assets form a dependency graph), to convert our code and assets into a 'bundle' which then can be deployed. It is mostly used in the front-end as it has more dynamic assets.
Let's Code It 🖥️
Install the latest version of NodeJS, if not done already. For the project, we will be using npm as our package manager but you are free to use yarn if you wish to.
Create Project & Install Dependencies 💉
We will be creating a ReactJS project to work with Webpack and Babel. First and foremost, we need to initialize the project with npm init.
Create an application directory as below and enter it.
  mkdir app
  cd app
Execute the command below to generate a
package.jsonfile in the currentappdirectory.npm initInstall ReactJS dependencies
npm i -S react react-domWe are installing
reactpackage for working with the ReactJS framework andreact-domfor building applications for browsers.Install Babel dependencies -
npm i -D babel-core babel-loader babel-preset-env babel-preset-reactbabel-corepackage is the core transpiler,babel-loaderpackage is a webpack loader that will help Webpack to use Babel transpiler,babel-preset-envpackage is used for transpiling ES2015+ syntax,babel-preset-reactpackage is used for transpiling React code.Note: babel-loader@8 requires babel@7. If you’d like to use babel@6. You should install babel-loader@7
npm install --save-dev babel-loader@7.0.0OR
npm install --save-dev babel-loader@7.0.0 --forceInstall Webpack dependencies -
npm i -D webpack webpack-cli webpack-dev-server html-webpack-pluginwebpackis the core package,webpack-clipackage is used to run webpack commands,webpack-dev-serverpackage is used to run React locally,html-webpack-pluginpackage helps to inject bundled JS files as a script tag into HTML file.
Don't worry! 🤕 No need to remember these packages and their uses by heart. We will learn more about them as we use them next...
Inside
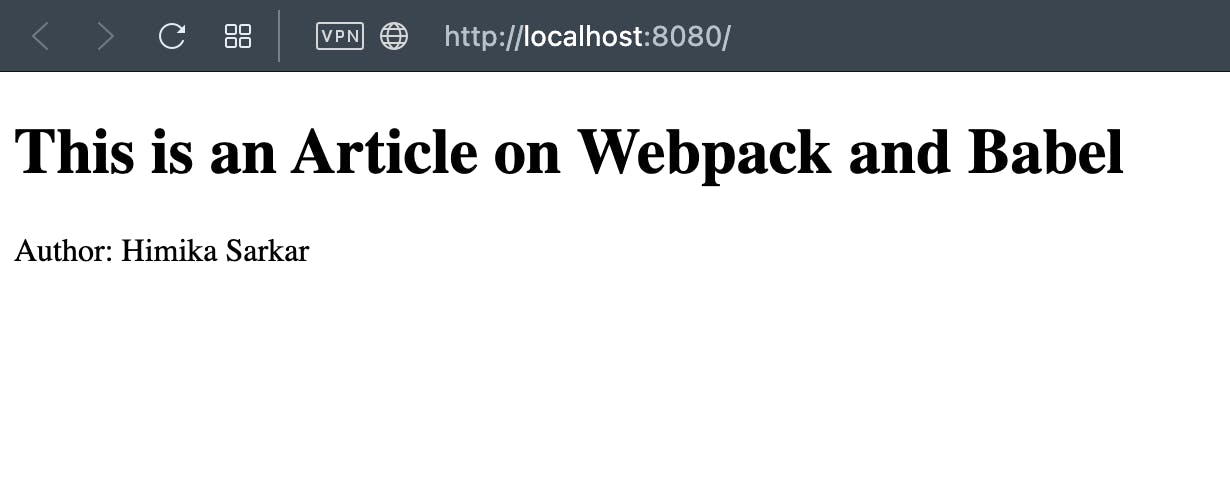
\appdirectory, create a new directory\srcand inside\app\src\folder, create a fileindex.jsand copy the following content -import React from 'react'; import ReactDOM from 'react-dom'; const App = () => ( <div> <h1>This is an Article on Webpack and Babel</h1> <p>Author: Himika Sarkar</p> </div> ) ReactDOM.render(<App/>, document.getElementById("root"));render()function is responsible for rendering the component<App/>in a DOM element withid="root"Inside
\app\srcdirectory, create a fileindex.htmland copy the following content -<!DOCTYPE html> <html lang="en"> <head> <meta charset="UTF-8"> <meta name="viewport" content="width=device-width, initial-scale=1.0"> <meta http-equiv="X-UA-Compatible" content="ie=edge"> <title>Article App</title> </head> <body> <div id="root"></div> </body> </html>
In the end, the package.json file should look like this -
{
  "name": "app",
  "version": "1.0.0",
  "description": "",
  "main": "webpack.config.js",
  "scripts": {
    "start": "webpack-dev-server --mode development --open --hot",
    "build": "webpack --mode production"
  },
  "author": "",
  "license": "ISC",
  "dependencies": {
    "react": "^18.2.0",
    "react-dom": "^18.2.0"
  },
  "devDependencies": {
    "babel-core": "^6.26.3",
    "babel-loader": "^7.0.0",
    "babel-preset-env": "^1.7.0",
    "babel-preset-react": "^6.24.1",
    "html-webpack-plugin": "^5.5.0",
    "webpack": "^5.75.0",
    "webpack-cli": "^5.0.1",
    "webpack-dev-server": "^4.11.1"
  }
}
FYI, we are installing Babel and Webpack as devDependencies and NOT dependencies as these packages are required only for local development. When the code is supposed to be deployed into Production, the bundled JavaScript will be deployed which will already be generated.
Configure Babel ⭐︎
Inside \app directory, create a file .babelrc and copy the following content -
{"presets":["env", "react"]}
The values env and react are 2 babel presets we had installed earlier.
Configure Webpack ☀︎
Inside \app directory, create a file webpack.config.js and copy the following content-
const path = require('path');
const HWP = require('html-webpack-plugin');
module.exports = {
    entry: './src/index.js',
    output: {
       path: path.join(__dirname, '/dist'),
       filename: 'bundle.js'
    },
    devServer: {
       port: 8080
    },
    module: {
       rules: [
          {
             test: /\.jsx?$/,
             exclude: /node_modules/,
             loader: 'babel-loader',
          }
       ]
    },
    plugins:[
        new HWP({
             template: path.join(__dirname,'/src/index.html')
        })
    ]
 }
entry: path.join(__dirname, '/src/index.js')This indicates the entry point of our application.
new HWP({template: path.join(__dirname,'/src/index.html')})The index.html file acts as a template and the content inside this file is supposed to change frequently. To achieve this concept, we are using HWP or
html-webpack-plugin.output: { filename: 'build.js', path: path.join(__dirname, '/dist')}This defines what is the folder path where the main bundle JS will be stored and what will the file be named as.
devServerHere development server-related configurations are present like we provided port number 8080 for the development server.
modulecomprises rules the webpack should be bound to.rules:[{ test: /\.js$/, exclude: /node_modules/, loader: 'babel-loader'}]This rule simply informs Webpack that it should transpile all Javascript files comprising ES5, ES6 codes using a loader babel-loader and exclude node_modules folder in the process.
pluginswill include any other transpiler or compiler plugin in the form of an array.
Execute the application ✅
Yayyy! Our app is ready! 🎉 One final step before we run our app, we need to add index scripts in our package.json file -
"scripts": {
    "start": "webpack-dev-server --mode development --open --hot",
    "build": "webpack --mode production
}
On triggering npm start in the terminal, the webpack-dev-server will be executed in local development mode and on successful execution, it will automatically --open the browser to display the application. Any changes made to the application will be updated --hot.
On running the application in development mode, we can see the following output -
To generate a bundle for production, run the below command -
npm run build
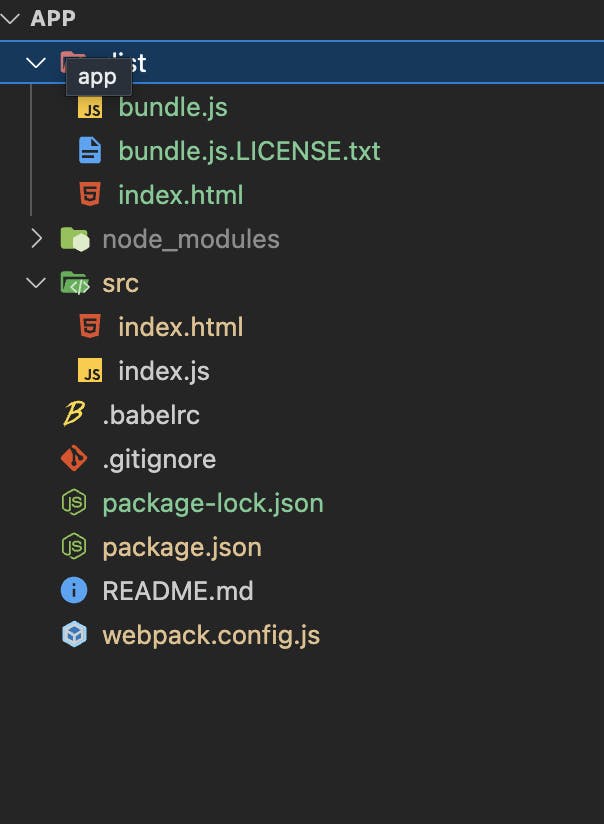
We finally have our code structure as -
Congratulations YOU, on completing this topic with as much fun as I had making it. At any point, if you are facing any issues with code, jump to my GitHub HERE to refer to. 🤗
Conclusion 🎬
Modern JavaScript frameworks such as React, Angular, and Vue.js include built-in support for Webpack and Babel, allowing developers to quickly set up a development environment without having to manually configure these tools. However, by manually configuring these tools, developers can customize their development environment as per their needs, gain a better understanding of how optimization works under the hood and work on legacy codes that require such implementation.
Thanks for learning this topic with me, see you in the next read... 🤙🏼